V6000 quick start
The MARSTEK V6000 is an all-in-one, waterproof energy storage system that combines a 6 kW pure-sine-wave inverter with a 15 kWh LFP battery. This page follows the V6000 user manual V1.0.
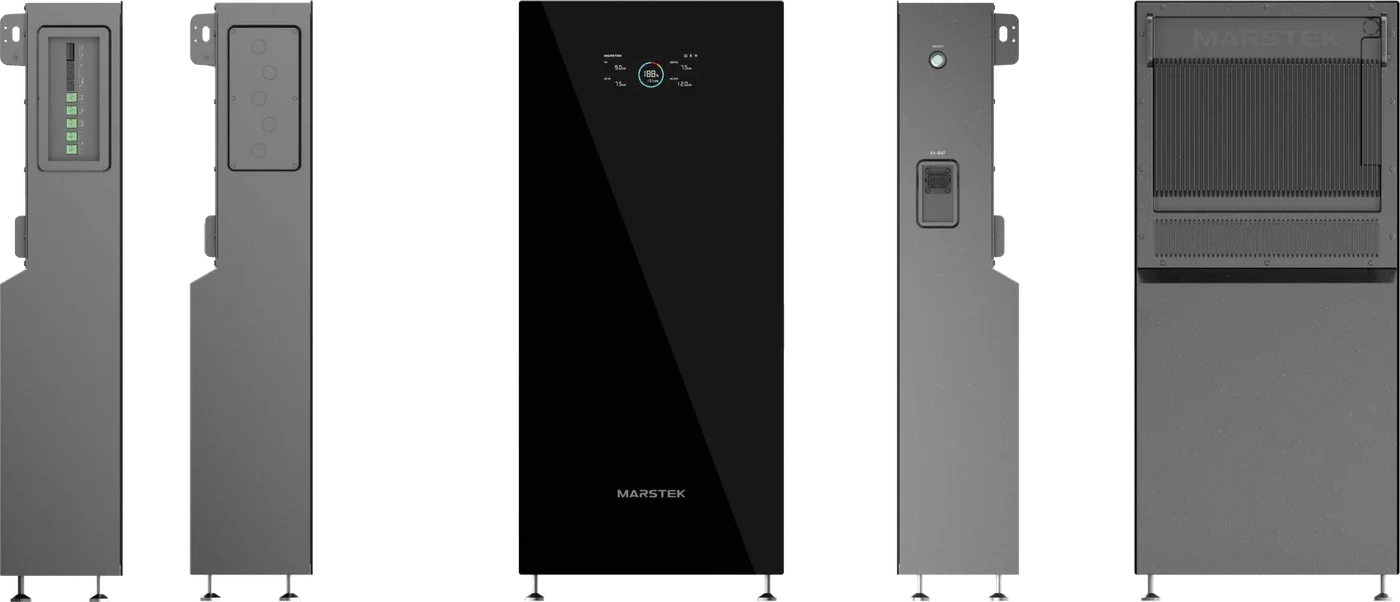
The manual states: "The whole system shall be installed and configured by professional technicians who are" company authorized, familiar with local electrical standards and safety regulations, formally trained and certified in ESS installation, and experienced in ESS installation and commissioning. After installation, users must not move components, change wiring or non-user settings, or touch the smart-meter or distribution-box connections. "Only authorized personnel may perform these tasks." Opening the enclosure or touching internal high-voltage parts must NOT be done by the user.
1. Overview
From the manual's product description: a waterproof 6 kW inverter / 15 kWh battery all-in-one system with a pure sine wave inverter (12 kW peak), a 15 kWh LFP battery expandable up to 90 kWh with 6000+ cycles, 2 MPPTs (9 kW max PV input), parallel scaling up to 6 sets (6–36 kW), 4 charging methods, IP65, and MARSTEK app control.
| Parameter | Value (manual section 2.3) |
|---|---|
| Battery | 15072 Wh (314 Ah × 1P × 15S × 3.2 V), LiFePO4, 48 V nominal |
| Cycle life | 6000 (down to 80% DoD) |
| Inverter | 6 kW continuous, 12 kW peak, pure sine wave |
| AC output | 230 V / 50 Hz, 26.1 A (29 A max), 1 × quick-connect terminal (40 A) |
| Solar input | 2 channels, 4.5 kW × 2, 80–500 V, 16 A max × 2 |
| AC input | 230 V / 50 Hz rated, 184–276 V, 32.6 A, AC-in power 7.5 kW, AC charge 6 kW, AC bypass 6 kW |
| Temperatures | Charging 0–50 °C, discharging −10–50 °C, storage −20–60 °C |
| Humidity / IP | 0–95% / IP65, natural cooling |
| Dimensions / weight | 510 × 235 × 1155 mm / 136.4 ± 1 kg |
| Display | Segment display |
| Certification (as listed) | UN38.3 & MSDS |
| Protection features | Insulation monitoring, residual current monitoring, DC reverse polarity protection, AC OV/OC/SC protection, Type II DC/AC surge protection |
- Operating altitude: the product description says 2000 m, but the spec table says 4000 m. Use the more conservative 2000 m until MARSTEK confirms.
- Grid frequency: the manual (marked EU edition) lists 230 V / 50 Hz for AC input and output. The Philippine grid is 220 V / 60 Hz. The 184–276 V input range covers 220 V, but the manual says nothing about 60 Hz. Check the unit's rating label or confirm with MARSTEK before connecting to the PH grid.
- "4 charging methods" are claimed, but the manual text does not name them. The inputs it documents for charging are AC-IN (grid), GEN (generator) and PV.
2. Interfaces and buttons (manual section 5.1)
| No. | Name | Marking | Use |
|---|---|---|---|
| 1 | Protective earthing point | PE | Enclosure grounding |
| 2 | System switch | ON/OFF | Main power switch |
| 3 | Extra battery port | EX-BAT | Connects MARSTEK-recommended battery packs to add capacity |
| 4 | Digital output | DO1/DO2 | Controls external devices (relays, alarms, auxiliary loads) |
| 5 | Communication port | COM | Monitoring, configuration, data |
| 6 | Parallel port | PARALLEL | Parallel communication between units (PARALLEL IN / OUT) |
| 7 | AC input port | AC-IN | Grid input for battery charging and bypass power |
| 8 | Generator terminal | GEN | Single-phase generator input |
| 9 | AC output port | AC-OUT | Powers connected loads |
| 10 | PV terminal | PV− / PV+ | Solar panel input |
Recommended wire gauges: PV 10–12 AWG, AC-OUT / GEN / AC-IN 8–10 AWG, DO1/DO2 20–24 AWG, RJ45 24 AWG. AC wiring colours: brown = L, blue = N.
"All wiring and connections to the AC-IN, GEN, AC-OUT, and PV terminals must be performed only when the unit is completely disconnected from all power sources and in a non-energized state." Wiring-harness work must only be done with the V6000 powered off.
3. Installation overview (installer)
Pre-installation check
Inspect the packaging for holes, cracks or crushing. Confirm the model on the label, then unpack and check against the packing list: user manual, quick guide, warranty card, M8 PG cable glands, M6 screws, wire ferrules, expansion bolts, wall brackets. Report damage or missing items to the vendor.
Prepare PPE and tools
PPE: goggles, protective gloves, safety hat, dust mask, insulating gloves, insulating shoes. Tools: power drill, screwdriver set, marker, tape measure, adjustable pipe wrench, ferrule crimp tool, level, wire stripper, wire cutter, hammer, heat-shrink tube, crimping pliers, RJ45 crimp tool, cable ties, heat gun.
Check the site
The unit must be installed vertically. Do not tilt it or turn it upside down. Keep the clearances shown in the manual drawing (≥ 1000 mm, ≥ 500 mm, ≥ 500 mm, ≥ 800 mm; see the diagram for which side is which). Do not work on the unit during thunderstorms, rain or strong winds.
Mount and secure
- Screw the wall bracket in place.
- Adjust the two front feet with a wrench until the V6000 is level, so it can't tip forward. The bracket should sit tight against the wall.
- Mark the holes from the bracket, move the unit away, drill, insert the M8 expansion bolts, then put the unit back and tighten.
Ground the unit
Remove the side panel. Knock out the knockouts and fit a PG cable gland. Terminate the ground wire with wire ferrules, connect it, and refit the side panel. The manual refers installers to the official website's documents and videos for full mechanical details.
4. Power on / off (manual section 5.1.2)
Power on
With the unit off, briefly press ON/OFF. The front screen lights up. Connecting AC-IN, GEN or PV for charging also wakes the unit and powers it on.
Power off
First make sure AC-IN, PV+ and PV− are all disconnected. Otherwise the unit cannot be shut down. Also make sure connected loads can be safely switched off.
5. Reading the display (manual section 5.2)
- PV / AC IN / GEN IN / AC OUT: live power for solar, grid, generator and load output.
- SOC ring: when charging, the ring fills from 0% up to the current level in a loop. When discharging, segments below the current SOC stay lit and the top segment flashes at 1 Hz.
- SOC % and remaining battery (kWh).
- Bluetooth, Wi-Fi and extra-battery-pack icons: lit = connected, unlit = not connected.
- Fault indicator: lights up and shows a three-digit fault code. See V6000 troubleshooting.
6. Working modes: Backup vs Economic (manual section 6.1)
Change the mode in the MARSTEK app.
| Backup Mode (default) | Economic Mode | |
|---|---|---|
| Goal | Keep the battery as close to 100% SOC as possible for outages | Cost-effective scheduling of grid, PV and battery |
| Setup | None, it is the default | Set Discharge SOC and Charge SOC in the app first (100% > Discharge SOC > Charge SOC > 0) |
| Grid + PV available | Grid supplies the load, PV charges the battery | SOC above Discharge SOC: no grid use, load runs on PV/battery only |
| Only PV available | PV supplies the load first | SOC between the two thresholds: load runs on grid, PV or battery as needed, but grid does not charge the battery |
| Neither available | Battery supplies the load | SOC below Charge SOC: grid, PV or battery supply the load, and grid actively charges the battery |
For Batangas households that mainly want the V6000 for brownout backup, the default Backup Mode keeps the battery full and ready. Economic Mode trades some reserve for lower grid use, so set the Charge SOC high enough for the backup the customer expects. This is a suggestion, not manual text.
7. Charging sources, expansion and parallel
- Charging sources documented: PV (2 MPPT, up to 9 kW), AC-IN grid (up to 6 kW AC charge) and GEN (generator). The manual claims "4 charging methods" without naming them (see the conflict note above).
- Battery expansion: through the EX-BAT port with MARSTEK-recommended battery packs, up to 90 kWh total per the product description. The manual does not name the expansion pack model or give a pack count.
- Parallel operation: up to 6 sets in parallel (6–36 kW) using the PARALLEL IN/OUT ports. The manual has no step-by-step parallel wiring or configuration procedure, only the port and the parallel alarm codes (035–041). Parallel systems must be designed and commissioned by authorised MARSTEK-trained installers.
8. App
The manual says the MARSTEK app connects over Bluetooth or Wi-Fi, shows real-time energy and device status, and supports Android 6.0+ and iOS 12.0+. It lists Google Play, the App Store and the download link https://eu.hamedata.com/ems/apk/marstek/index.html, plus a QR code for the app operation guide.
9. Maintenance, storage and safety
- Inspect at least once every six months. Monthly visual checks: terminal corrosion, alarm codes, loose cables, and a clean area free of flammables and dust.
- Cleaning: system OFF, soft dry cloth only. No liquid cleaners, solvents or sprays.
- Call for professional service if you see persistent alarm codes, unusual noise, odour, overheating, bulging or leakage, a sudden loss of capacity or output, or burnt or discoloured cables.
- Storage: −20 to 60 °C, ≤95% RH, upright, indoors and dry. Store at 50–60% SOC and recharge every 1–2 months. After long storage, inspect it, charge to ≥80% SOC, and test AC OUT and PV input before use.
- Unapproved uses: not for elevators, essential medical equipment, fire/rescue equipment, or any load whose stoppage could threaten human safety.
- Fire: evacuate and call the fire department. If the battery is burning, use fire sand, a CO2 extinguisher or other approved electrical-fire equipment. Flood: don't touch the unit, switch off the breakers, wait for the water to recede, and do not reuse a flooded battery.
Related pages
Sources
- V6000 user manual V1.0 (Drive): primary source
- V6000 datasheet (Drive)